Setting Posts with the Tractor

I was putting up the posts for the deer fence around our new garden in the back field.
Some of the posts were pretty big.
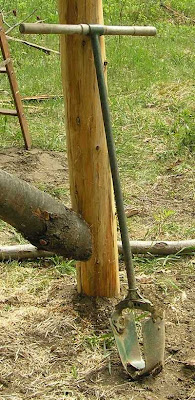
Usually, I use my post hole auger to put in posts. Our land is relatively rock free, mostly sand and clay. So the auger makes a neat hole as deep as I can go with the handle. I can do a little more than 40" with this bar. The bar can be threaded out of the of the head and an extension added. But the hole is only 8 - 12" in diameter. Not big enough for the posts I am working with.
 I wanted a tall fence, about 8 feet to keep the deer out. I don't have any cedar on my land but I can get nice 8 foot cedar posts for as little as $6. But posts long enough for an eight foot fence start to get a little pricey, if I can get them at all. But I can cut over sized posts from my own land. And I can get them in any length I want. They might not last as long as cedar, but that's why I cut them over sized. I will use increased girth to make up for inadequate material.
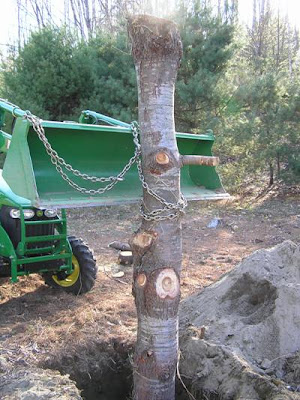
 With such big posts, I had to cheat and use the tractor to move them, set them and dig the holes. It was good practice with the backhoe, though. I got good at digging deep without making a wide hole. Some of the holes were as much as seven feet deep. I would get as deep as I could staying narrow with the backhoe and then finish with a shovel. Since I was still making a sizable hole, I put in a footer log at or near the bottom. That and a log buried close to the surface on the opposite side give the post extra resistance to tipping under the tension of the fence.
 I like to make corner posts with an outrigger, horizontal and a diagonal brace in each direction the fence goes around the post. This kind of bracing can be done without the diagonal brace using a tension cable instead, but I prefer to use wood under compression.
 I notched the posts and used 1/2" rebar to pin them. My goal is to make sure the diagonal brace starts out under compression before I string the fence. After I assembled the diagonal brace and attached the horizontal to the main post I used a crude windlass to winch the outrigger post into the notch of the horizontal. I cut the notch in the horizontal about 2" short so the outrigger is drawn in, putting the diagonal under compression.
It was fun working with these larger timbers. I got a lot of experience making notches with a chainsaw. But they were heavy enough that I had to figure out some mechanical helpers to help during assembly. Things like using the flat webbing to suspend the diagonal brace while I scribed the angle for the end cuts or fitted the pins.

Over all, I am happy with these corner posts. I learned a lot putting them up. They are different and significantly bigger than ones I have put up before. So there are plenty of things I did one way on the first one but learned to do better before I got to the last one. But the are all rock steady. Standing on top of one gives a nice view of the garden area. There is a lot of mass in the posts and I was careful to get them tight. Now I need to string the wire.


5 Comments:
Nice work!
Nice pictures.
Did you get a new camera?
By Wanna BEE Farm, at 4:29 AM
My guess is you are going to be happy with how long those corner posts last for you. They look a bigger then the ones we used for our garden shed more then ten years ago and those are still holding strong.
-Holly
By Holly, at 3:40 AM
OK, I have two comments to make:
1) those are some huge posts there, friend.
2) no rocks? Able to dig post holes with a little old auger? I am green with envy.
By Lisa Carroll-Lee, at 11:03 AM
If you take the picture with you standing behind the corner post, it will look even BIGGER.
Looking at the size of those posts! Its going to give many farmers corner post envey!
I feel so inadequate after seeing your post on Posts.
Big posts and sand soil. Life is good :) JK
By Anonymous, at 2:44 PM
I understand that charring the wood esp where the dirt and wood and air connect (the most vulnerable area) is very effective in preserving the wood and keeps it from rotting.
Very nice work!!
By damae, at 9:20 AM
Post a Comment
<< Home